TFLearn: A Simplified Interface for TensorFlow

Link: http://tflearn.org

TFlearn is a modular and transparent deep learning library built on top of Tensorflow. It was designed to provide a higher-level API to TensorFlow in order to facilitate and speed-up experimentations, while remaining fully transparent and compatible with it.

TFLearn features include:

  • Easy-to-use and understand high-level API for implementing deep neural networks, with tutorial and examples.
  • Fast prototyping through highly modular built-in neural network layers, regularizers, optimizers, metrics…
  • Full transparency over Tensorflow. All functions are built over tensors and can be used independently of TFLearn.
  • Powerful helper functions to train any TensorFlow graph, with support of multiple inputs, outputs and optimizers.
  • Easy and beautiful graph visualization, with details about weights, gradients, activations and more…
  • Effortless device placement for using multiple CPU/GPU.

The high-level API currently supports most of recent deep learning models, such as Convolutions, LSTM, BiRNN, BatchNorm, PReLU, Residual networks, Generative networks… In the future, TFLearn is also intended to stay up-to-date with latest deep learning techniques.

Quick overview

Code Example

# Classification
tflearn.init_graph(num_cores=8, gpu_memory_fraction=0.5)

net = tflearn.input_data(shape=[None, 784])
net = tflearn.fully_connected(net, 64)
net = tflearn.dropout(net, 0.5)
net = tflearn.fully_connected(net, 10, activation=’softmax’)
net = tflearn.regression(net, optimizer=’adam’, loss=’categorical_crossentropy’)

model = tflearn.DNN(net)
model.fit(X, Y)


# Sequence Generation
net = tflearn.input_data(shape=[None, 100, 5000])
net = tflearn.lstm(net, 64)
net = tflearn.dropout(net, 0.5)
net = tflearn.fully_connected(net, 5000, activation=’softmax’)
net = tflearn.regression(net, optimizer=’adam’, loss=’categorical_crossentropy’)

model = tflearn.SequenceGenerator(net, dictionary=idx, seq_maxlen=100)
model.fit(X, Y)
model.generate(50, temperature=1.0)

There are many more examples available here.

Where to Start?

To install TFLearn, see: Installation Guide.

If your version of Tensorflow is under 0.7: Upgrade Tensorflow.

For a tutorial: Getting Started with TFLearn.

For more examples: Examples List.

To browse the API, check the API Documentation.
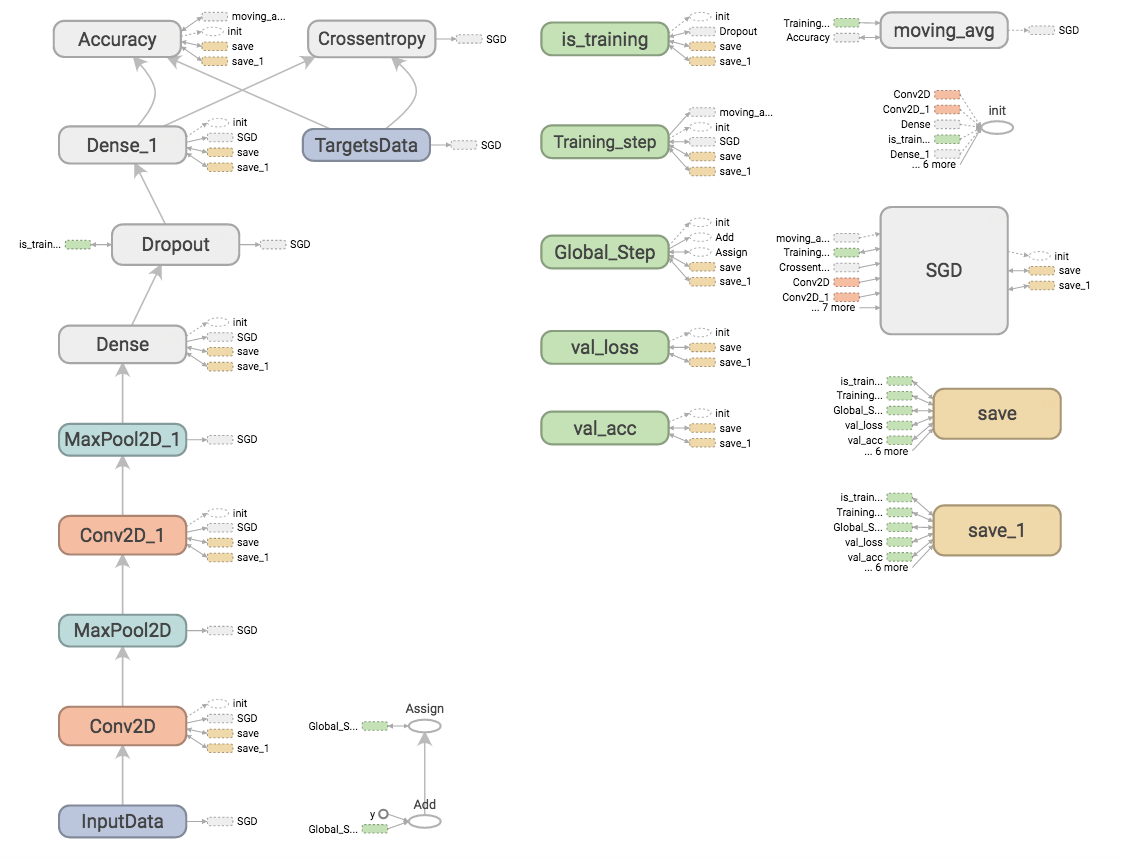
 

Model Visualization

Graph


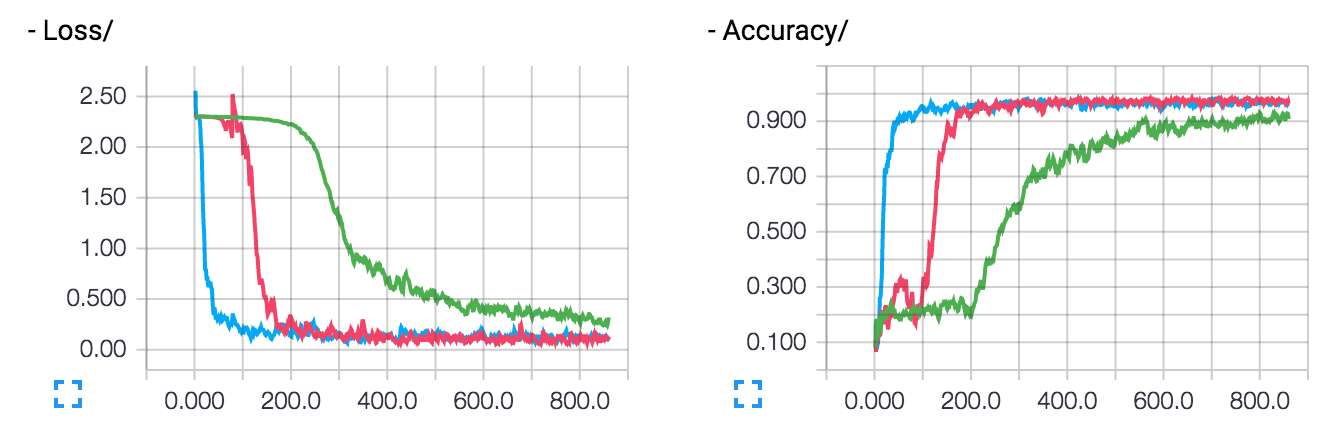
Loss & Accuracy (multiple runs)
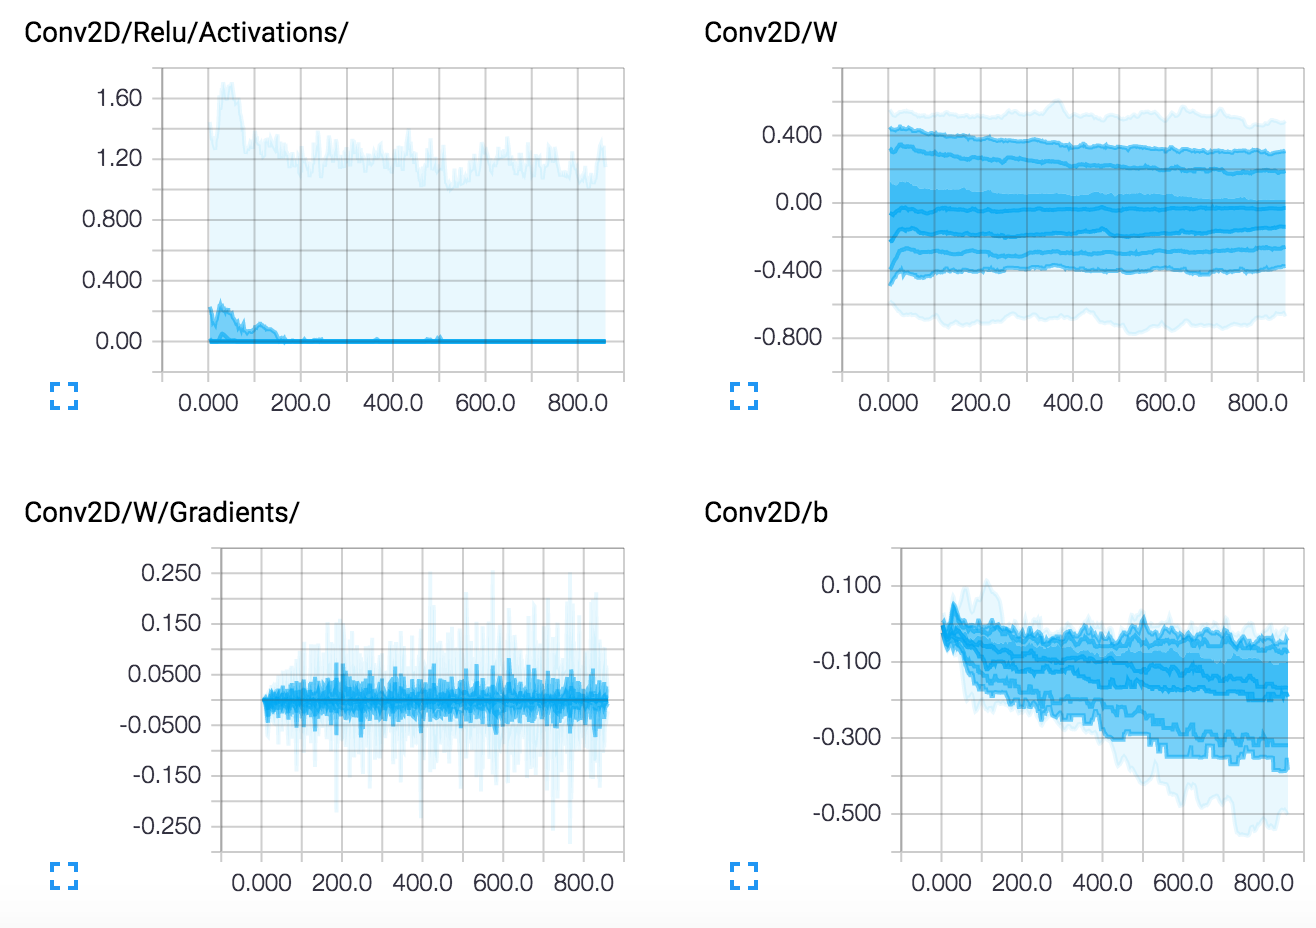
Layers


Sources

GitHub: https://github.com/tflearn/tflearn


Contributions

This is the first release of TFLearn, if you find any bug, please report it in the GitHub issues section.

Improvements and requests for new features are more than welcome! Do not hesitate to twist and tweak TFLearn, and send pull-requests.


License

MIT License

Read More

Install Tensorflow with cuda 3.0 compute compatibility devices

This tutorial will explain you how to setup Tensorflow with cuda 3.0 compute compatibility devices (such as NVIDIA Grid K520, GTX580, GTX650, GTX770, GTX780…)

Basically, You need to use that specific build of Tensorflow if you encounter this kind of error message:

tensorflow/core/common_runtime/gpu/gpu_device.cc:611] Ignoring gpu device (device: 0, name: GRID K520, pci bus id: 0000:00:03.0) with Cuda compute capability 3.0. The minimum required Cuda capability is 3.5.

1 – Install Bazel

First, you need to install Bazel. I recommend to use Bazel 0.1.0, because some other builts raise errors when compiling Tensorflow.

1.1 – Setup Java JDK-8
Bazel requires java jdk-7 or 8. Follow the steps to install it:

Ubuntu (14.04)

$ sudo add-apt-repository ppa:webupd8team/java
$ sudo apt-get update
$ sudo apt-get install oracle-java8-installer

Ubuntu (15.10)

$ sudo apt-get install openjdk-8-jdk

1.2 – Install other dependencies

$ sudo apt-get install pkg-config zip g++ zlib1g-dev unzip

1.3 – Download Bazel 0.1.0
https://github.com/bazelbuild/bazel/releases/download/0.1.0/bazel-0.1.0-installer-linux-x86_64.sh

1.4 – Compile Bazel

$ chmod +x bazel-version-installer-os.sh
$ ./bazel-version-installer-os.sh --user

Bazel executable is located at: $HOME/bin/bazel

2 – Install Tensorflow

2.1 – Install dependencies

$ sudo apt-get install python-numpy swig python-dev wheel git

2.2 – Download Tensorflow 0.7.0

$ git clone --recurse-submodules https://github.com/tensorflow/tensorflow.git -b 0.7.0

2.3 – Compile Tensorflow

Configurate tensorflow built with cuda 3.0 compute capability

$ cd tensorflow
$ TF_UNOFFICIAL_SETTING=1 ./configure

Indicate basic settings according to your config.
For cuda compute compatibility, enter: 3.0

Compile tensorflow

$ $HOME/bin/bazel build -c opt --config=cuda //tensorflow/cc:tutorials_example_trainer
$ bazel-bin/tensorflow/cc/tutorials_example_trainer --use_gpu

After compiling, you should get that output:

000009/000005 lambda = 2.000000 x = [0.894427 -0.447214] y = [1.788854 -0.894427]
000006/000001 lambda = 2.000000 x = [0.894427 -0.447214] y = [1.788854 -0.894427]
000009/000009 lambda = 2.000000 x = [0.894427 -0.447214] y = [1.788854 -0.894427]

3 – Install Python interface

If you are planning to use tensorflow python interface, you first need to create a pip package to install it.

3.1 Create pip package

First step is to use bazel to create pip package

$ $HOME/bin/bazel build -c opt --config=cuda //tensorflow/tools/pip_package:build_pip_package

3.2 Install python tensorflow

We can then use that pip package to install tensorflow in python

$ bazel-bin/tensorflow/tools/pip_package/build_pip_package /tmp/tensorflow_pkg

# The name of the .whl file will depend on your platform.
$ pip install /tmp/tensorflow_pkg/tensorflow-0.6.0-cp27-none-linux_x86_64.whl

3.3 Test it

To check if everything is working well, you can run that example:

$ cd tensorflow/models/image/mnist
$ python convolutional.py
Successfully downloaded train-images-idx3-ubyte.gz 9912422 bytes.
Successfully downloaded train-labels-idx1-ubyte.gz 28881 bytes.
Successfully downloaded t10k-images-idx3-ubyte.gz 1648877 bytes.
Successfully downloaded t10k-labels-idx1-ubyte.gz 4542 bytes.
Extracting data/train-images-idx3-ubyte.gz
Extracting data/train-labels-idx1-ubyte.gz
Extracting data/t10k-images-idx3-ubyte.gz
Extracting data/t10k-labels-idx1-ubyte.gz
Initialized!
Epoch 0.00
Minibatch loss: 12.054, learning rate: 0.010000
Minibatch error: 90.6%
Validation error: 84.6%
Epoch 0.12
Minibatch loss: 3.285, learning rate: 0.010000
Minibatch error: 6.2%
Validation error: 7.0%
...
...

If you meet any difficulty you can leave a comment!

Read More

TensorFlow Tutorial for beginners

Here are some simple tutorial to discover TensorFlow.

Link: https://github.com/aymericdamien/TensorFlow-Examples

This tutorial is designed to easily dive into TensorFlow through examples. Basic calculation examples and famous machine learning algorithms (such as Regression, Nearest Neighbor, Neural Network, Convolutional Neural Network) are implemented, with code explanation.

Tutorial Index:

1 – Introduction

– Hello World
– Basic Operations

2 – Basic Classifiers

– Nearest Neighbor
– Linear Regression
– Logistic Regression

3 – Neural Networks

– Multilayer Perceptron
– Convolutional Neural Network
– AlexNet
– Reccurent Network

4 – Multi GPU

– Basic Operations on multi-GPU

5 – User Interface (Tensorboard)

– Graph Visualization
– Loss Visualization

If you have any question, you can leave a comment or open an issue on github 🙂

Read More

error: library dfftpack has Fortran sources but no Fortran compiler found – CentOS

I recently ran into that error. My system is using centOS-6, with gcc installed. but I was unable to pip install / or install scipy from source. I checked on internet, many suggested to install gcc, but my system already had gcc and a gfotran compiler.
I finally fixed it by myself, just add a post, if can help anyone:

To fix this error on centOS-6:

error: library dfftpack has Fortran sources but no Fortran compiler found

Just yum install “gcc-gfortran.x86_64 : Fortran support”

sudo yum install gcc-gfortran.x86_64

That’s it! pretty simple 😉

Read More

Tutorial: Install Caffe on CentOS 7

Caffe is one of the most powerful framework to train deep neural networks. This tutorial will show you how to install Caffe on CentOS 7 step by step.

I suggest you to apply this tutorial on a computer with a new and clean installation of CentOS 7.

Step 1: Install Basics

Update yum to get last version

sudo yum update

Install gcc compiler:

sudo yum install gcc gcc-c++

Install git, vim, python dev and pip:

sudo yum install git vim python-devel python-pip

Step 2: Install Caffe Dependencies

Install required libraries

sudo yum install protobuf-devel leveldb-devel openblas-devel snappy-devel opencv-devel boost-devel hdf5-devel gflags-devel glog-devel lmdb-devel

Install CUDA

sudo wget http://developer.download.nvidia.com/compute/cuda/repos/rhel6/x86_64/cuda-repo-rhel6-6.5-14.x86_64.rpm
sudo rpm --install cuda-repo-rhel6-6.5-14.x86_64.rpm
sudo yum clean expire-cache
sudo yum install cuda

Step 2b: GPU Support (Optional: ONLY if computer has CUDA compatible GPU)

Note: CUDA only support NVIDIA graphic cards. ATI Radeon GPU can’t be used, you will have to stick with CPU only mode.

Download and Install last NVIDIA Driver for your device

Go to NVIDIA website, download your graphic card last driver and run the driver file to install it

Download and Install CUDNNv3 (You need to register to NVIDIA website to get last version, or just use the mirror provided below)

wget ...
sudo tar -xvf cudnn-7-0.tgz
sudo cp cuda/include/cudnn.h /usr/local/cuda/include/
sudo cp cuda/lib64/libcudnn* /usr/local/cuda/lib64/

Step 3: Get Caffe

Git clone Caffe repository

git clone https://github.com/BVLC/caffe

Step 4: Install Python Dependencies

Caffe has a Python interface for easy scripting, I suggest you to install it.

for req in $(cat caffe/python/requirements.txt); do sudo pip install $req; done

Step 5: Compile Caffe

Move to Caffe folder and copy/paste Make configuration file

cd caffe
cp Makefile.config.example Makefile.config

Edit Makefile.conf

vim Makefile.config

Edit the line

BLAS := atlas

Change ‘atlas’ to ‘open’

BLAS := open

And add a new line under it:

BLAS_INCLUDE := /usr/include/openblas

Then edit line: (located under “PYTHON_INCLUDE := /usr/include/python2.7 \”)

		/usr/lib/python2.7/dist-packages/numpy/core/include

Change python directory to ‘/usr/lib64/python2.7/site-packages/’, the line should then looks like that

		/usr/lib64/python2.7/site-packages/numpy/core/include


Then edit according to your device GPU capability:

Without GPU support:
Edit the line

# CPU_ONLY := 1

Remove the number sign “#”. The line will then looks like this:

CPU_ONLY := 1

Save and Close file

— OR —

With GPU support:

# USE_CUDNN := 1

Remove the number sign “#”. The line will then looks like this:

USE_CUDNN := 1

Start to compile Caffe

sudo make all
sudo make runtest
sudo make pycaffe
sudo make distribute

Done!

Now you can start to try Caffe examples and tutorials.

If you have any question, you can leave a comment.

Read More